Vinyls
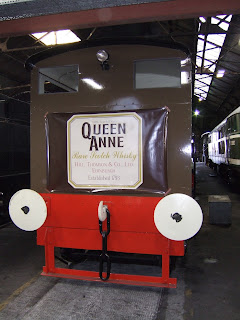
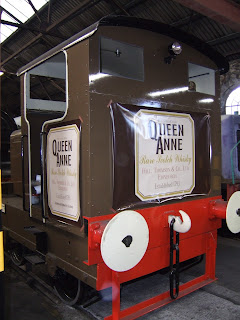
The self-adhesive vinyls have arrived. The artwork had been prepared some time ago using desktop publishing software and are an accurate representation based on measurements of the old panels and some trickery to create a "Queen Anne" font very similar to the original. The quality of the printing is very good. The artwork has been printed on standard 40" x 60" and 700 x 1000 mm sheets with a brown border that will be trimmed prior to fitting.
Two of the vinyls were taped in position on the cab sides to gain an overall impression :-
 |
| Rear Vinyl |
 |
| Cabside Vinyl |
 |
| View of both vinyls |
The same brown colour (NCS S 7020-Y30R) was specified for the paint and printing, but inevitably different processes produce different colours. The excess darker brown on the vinyls will in any case be trimmed off before fitting.
The vinyls will be applied once the lining has been painted.
Curtains
The curtains have been made and are ready to fit, which will be done after the final coats of paint have been applied inside the cab. Oilcloth was tried initially, but proved unsuitable so waterproof vinyl cloth was tried and works very well.
The fabric was cut slightly oversize based on initial measurements and a wide hem was stitched on the top edge. It was determined that 10 eyelets per curtain were required and these were riveted to the hem using a tool specially bought for the job. The eyelets are marine grade solid brass (not the cheaper brass plated ones) with a 1/2" hole.
The curtains were threaded onto the curtain rods using the best of the original copper curtain rings and some new ones. In a previous post it was explained that the old rings had been used in the whisky still in a device to prevent frothing. The curtains were then trial fitted to obtain the correct width and drop :-
 |
| Cosy Cab |
The curtains were then taken away, trimmed to size and a 1/2" hem stitched on the other three sides at the curtain workshop :-
 |
| The final curtain |
Fuel Dipstick
There is no fuel gauge on Queen Anne, so a dipstick was made from a piece of oak. The level markings were calculated based on original Ruston drawings of the fuel tank that are archived on the Lincs To The Past website. Artwork was produced using Autocad and the markings burnt on using the Laser Engraver at Kingussie High School.
 |
| The Fuel Dipstick |
While re-routing the fuel pipe from the tank to accommodate the Chain Oiler, it was noticed that fuel was not flowing freely from the tap under the tank. This was because the tap had become blocked with rust flakes. Fuel taps for motorbikes etc. often have a tubular gauze filter that pokes up into the tank, so it was decided to obtain one of these and fit under the tank. This should ensure a free flow of diesel in future.
The installation of the chain oiler is nearly complete, and will feature in a future blog post.


No comments:
Post a Comment