Title

While the main focus of the Strathspey Railway is running steam trains for the paying public, a small but dedicated group of volunteers has been restoring other items of heritage interest in spare moments between working on the loco fleet and improving locoshed infrastructure and facilities.

The current project is a Ruston Hornsby 48DS diesel shunter of 1948 which worked at Longmorn distillery until 1980 (even though Dr Beeching had closed the adjacent main line in 1967). Because it was presented to the Strathspey Railway repainted with advertisements for Queen Anne blended scotch whisky, it is known to most people as “Queen Anne”.

To find out more about our aims, follow this link or click the [About] button above.

This Blog was started over 5 years after the project began, so most of the initial blog entries are retrospective.

Sunday 24 November 2019

Wiring and Colour Schemes

Wiring completed

It is fortunate that in 1948 Ruston Hornsby made extensive use of electrical components used in cars of that era.  The enduring popularity of classic car restoration means that many of these components are still produced, meaning that Queen Anne’s electrical system can be restored to its original condition.  In particular, brass bound armoured cable would be very difficult to imitate were it not still being made (although at a premium price).

The electrical system is very simple and the photographs below show the various components wired up to the control box and working.  Similar armoured cable has also been used to connect to the battery, starter and dynamo.

The front light

The rear light

The cab light

Control box and wiring

Note LH horn switch by cab opening

Colour Schemes

Recently some colour photographs of Queen Anne in its original green livery have been obtained.  The green colour is certainly not the standard “Deep Bronze Green” as used by Rustons before WW2 and later on.  Some of these colour photographs can also be seen on the revised “Queen Anne History” page.


An early view at the loading dock

A later view in 1979 or 1980
Prior to donation to the Strathspey Railway in 1980, Queen Anne was repainted with the whisky advertisements on a chocolate brown background.

Getting ready to leave Longmorn

Some more of the Longmorn staff

The new livery with chocolate brown background
Some time after arrival at Aviemore the background was repainted in a beige shade.  This has been confirmed by sanding down the paintwork and by comparing the lining above the rear advertisement, which is lower down after the beige repaint.  All this may seem a bit pedantic, but modellers seem to be very particular about liveries.

Note brown background and lining on rear panel


Later beige background and different lining
One outstanding item in the restoration of Queen Anne is the restoration of the bi-fold louvre doors on the bonnet sides.  These were replaced with flat panels when the locomotive was repainted with the Queen Anne whisky advertisements in 1980.  The louvre doors will take some time and effort to reproduce due to the rolled edges and punching the louvres themselves.


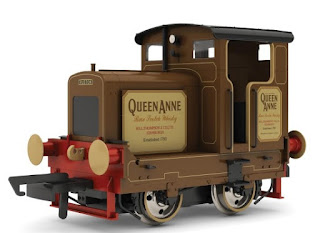
The Queen Anne style flat doors would be much easier to make and in view of the fact that Hornby is producing a model of Queen Anne in its as-donated livery, it has been decided to initially restore the locomotive in the same form as the Hornby model.  This would be contingent on financing the brown background paint and the vinyls for the whisky advertisements.
The Hornby Model


The ultimate goal is still to return the locomotive to its 1948 condition, but restoring to “Queen Anne” condition initially may help generate more widespread interest in this restoration project in view of the imminent release of the Hornby model.


Tuesday 15 October 2019

Paintwork

Painting Progress

The bodywork has been rubbed down and a grey undercoat applied to around 50% so far.  A further undercoat may be applied followed by the top coats.
Rear perspective

Front perspective

Interior
The exact shade of green for the topcoat has still to be decided.  A piece of the original bodywork has been kept and sand blasted to reveal the original colour.  This seems much lighter that the "Deep Bronze Green" (BS381C 224) paint sample we have - the original "Ruston Green".  A book about Ruston locomotives states they used a lighter shade of green for a while after World War 2 before reverting back to the original Deep Bronze Green.  Perhaps our green is this lighter shade, or perhaps it was a special colour.  It doesn't seem to be a BS381C colour.
Original panel and paint sample

Engine

The engine is now running nicely with all its injectors now having the correct "VRH" nozzles.  It has been cleaned up ready for a final touch-up with special Ruston Green engine paint.
Cleaned Engine LHS

Cleaned Engine RHS

Cable

The armoured cable has arrived thanks to a £200 contribution from the Strathspey Railway Association's "200 Club".  New cable clips have been ordered and rewiring has begun.  The ends of the brass wire need to be bound with cotton cord and varnished to prevent them unravelling.

A cable end with cotton binding


Saturday 15 June 2019

Cab Roof Finished


Cab Roof Finished and Window Seals

Cab Progress


The new cab roof has been rolled from a single sheet of 2mm mild steel by a company in Elgin.  The main part of the roof (3200mm radius) was formed by rolling and the edges (150mm radius) were formed by discrete bending.  A template was provided to assist in the forming process.  The roof was lifted into place and did not require any adjustment.  It was then drilled and bolted to the curved angles which are fixed to the cab ends using ¼" Whitworth round headed bolts specially machined out of stainless steel.
The new roof is delivered
The roof is fitted
The roof has half-round feather edging riveted all round its edges.  This requires four pieces to be formed (one for each corner).  The roof corners are 4” radius and the edging is first bent to 90 degrees using the same bending jig as was used for the edging on the cab side openings, but with a different disk to get the correct radius.  The strips then have to be curved in the other direction to conform to the roof profile.

The first step is to bend the 3200mm radius using a set of bending rollers.
The next step is to bend the 150mm radius at the edge, which is much harder.  This is done by clamping the strip to the side of the roof to mark it, then heating that area and bending that small section only.  The process is then repeated many times until the curve matches the roof.  The edging is then drilled with 3/16 inch fixing holes and temporarily fixed to the roof using 2BA nuts and bolts.
Forming the 3200mm radius
Making the edging fit
A peculiar feature of the original edging was that 1” wide strip was used around the cab roof and 1¼” strip was used around the cab opening.  At the top of the cab opening the two different widths were welded together which can best be understood by looking at the pictures.  The roof edging is separate from the edging around the cab sides so that the roof can be unbolted and removed separately.
The completed cab
Curved rain bars are fitted each side so that most of the rain water drips off front and back and not over the cab opening.  They are attached to the roof using 2BA stainless bolts tapped into the roof with a locking nut behind.  This means further trimming of the edging.  All in all a lot of time-consuming “fettling” is required to get everything fitted properly.
 
To prevent corrosion a sealing compound was used between the edging and the roof and rain bars and the roof.  Shell Tixophalte was chosen for this as it is a high specification waterproof seal.  The sealant was applied and the edging bolted back using 2BA nuts and bolts which were tightened to squeeze out surplus sealant.  The bolts were then removed one at a time and replaced by rivets which were hammered over by hand.  The roof is now ready for final painting with black bitumenous paint.
The completed roof. Note the different edging widths on the side of the roof.
The specially-made roof fasteners
The battery box has been fixed in and the battery fitted inside.  A heavy-duty battery isolation switch has been fitted on the side of the box.  Only the starter motor is connected at the moment.  The next step will be to connect the dynamo and check that is charges OK.  The rest of the wiring will need to wait for new brass-bound armoured cable to replace the originals.
The battery box is fitted
The original cab interior had a cream roof and dark green walls and battery box.  It has been decided to paint the upper half of the cab interior cream as well to make the cab lighter.
Undercoat applied to cab interior

Window Seals

The windows on the front and back of the cab have aluminium frames with special rubber seals to hold the glass in place.  The original rubber seals were perished but we still have a sample piece.  To fit a window, the rubber seal is placed around the glass and offered up to the frame.  The seal has a “flap” at the front that must be pushed into a groove all round the frame in order to stop the glass coming out.
 
The picture shows the sample piece inside the frame.  The insert on the right shows the cross-section of the rubber seal.  The insert on the left shows the nearest profile that is theoretically available.  Unfortunately, this profile is not a stock item, and the manufacturers require an order of at least 30 metres at £15 per metre.  As we only need 7 metres this is not an option.
The window seal with profiles.
The next approach is to consider 21st Century technology in the form of 3D Printing.  It may be possible to print sections of seal in a suitable material.  Shorter lengths could be glued together with Cyanoacrylate adhesive as most 3D printer beds are not long enough (we need 21”).
 
We have access to an early 3D Printer for the purposes of investigation.  If the process looks promising, we may need to investigate getting the job done externally if this is not too expensive.
 
An initial sample length of the seal has been drawn up using 3D CAD software.  3D printers normally print rigid shapes using ABS plastic, so we will produce trial samples in this material to get the best profile and finish.  If this looks good we will buy some TPU filament (Thermoplastic Polyurethane) and try printing a sample in that material (which is flexible).  If that works, we will look at getting all the seals printed.
First trial samples in ABS
However, it is still quite possible that 3D Printing will not be good enough with currently available technology.  In that case we will use rectangular U-shaped seals (which are available from stock) and glue the seals to the frame.  Of course this means that if in future you need to replace the glass you will probably have to destroy the old seals and replace them with new, but it is the only affordable way out.
 

Thursday 24 January 2019

Progress with New Cab and a Queen Anne Miniature

Cab Progress

Quite a lot of progress has been made recently, partly because the hydraulic riveter is due to go back to Bo’ness soon.  The cab sides have now been completely built, leaving only the roof to complete the structure.

Cab view
New Cab
When the cab platework was produced by water jet cutting from the CAD drawings, all the fixing holes were included.  However the angle irons and flat bar that is used to join it all together still needed to be cut and drilled to match, which was quite time-consuming.  The angle irons all have one leg that is riveted to the panel and the other leg is bolted.  This means that all the cab panels can be unbolted from each other.
Another view of the cab

Rear view of cab
Rear view of cab

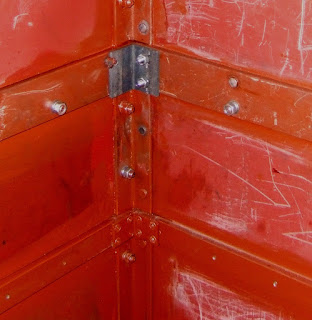
The original joining bars and stiffeners were welded where they meet at the corners, which caused some distortion and prevented the rear and side panels from being separated easily.  For the new cab, the corners are stiffened by short pieces of angle that are bolted to the bars.  These bits are required to prevent the sides of the cab bending outwards slightly as you grab the handrails to climb up.
Detail of corner stiffeners
Detail of corner stiffeners.  Note rivets and stainless steel bolts.

The lights and horn were temporarily fixed to the cab for the photographs.
 

The original cab roof was only in fair condition and had been bent when Queen Anne was hoisted out of its isolated bit of track back in 2010.  It would have been possible to straighten it but some creases would still have shown.  So it was decided to have a new roof sheet rolled and this should arrive soon.  The original was made of two pieces welded together to produce a 6’2” by 7’6” sheet unrolled, but sufficiently large single sheets are now available.  The curved angles that fix the roof to the cab ends will need to be modified as the curve of the new cab panels is slightly different to the originals.

Injectors

As described in an earlier blog post, our injectors were fitted with the wrong nozzles (VPH instead of VRH) when Queen Anne was at Longmorn.  While the engine runs OK, it would run better if it had the correct nozzles.  However neither complete injectors nor replacement nozzles are available now in spite of exhaustive searching.
The injectors from Ebay
Fortunately, a set of four second-hand VRH injectors were spotted on Ebay.  Although not used for some time, two had been serviced and should work while the other two should be serviceable.  A winning bid was submitted and we now have the injectors.  So we should eventually be able to fit four injectors with the correct nozzle and still have one spare.

Queen Anne in Miniature

Hornby have just announced production of an 00-Gauge Ruston 48DS (click for details).  It will be produced in four variants, one of which is Queen Anne as it was when it originally arrived at the Strathspey Railway.  The model is a good representation of Queen Anne as it was around 1980.  It must be based on photographs from the Internet as I am not aware of any approach by Hornby to the Strathspey Railway for details.
The Hornby Model
The Hornby Model

It is hoped that the model will prove popular and will help draw attention to our restoration project here at Aviemore.
 

The model is expected to be available in July 2019 and will most likely beat the restoration of the real Queen Anne.  Finance is one of the limiting factors in the restoration, which relies on donations (eg. Strathspey Railway Association and Friends of Broomhill) and contributions from those carrying out the restoration (eg. the recent purchase of injectors on Ebay).  The main items required for completion are brass-bound armoured cable (still available, but almost £200 to replace the life-expired originals) and fabrication of the engine bay louvre doors (which require specialist tooling to produce the rolled hem).